You are hereBlogs
Blogs
Voyage Linux and MPD 0.11.0 (silently) released
We announced the availability of Voyage Linux and MPD 0.11.0 today. This release was actually prepared in Jan 2017. Kernel is now updated to 4.1 series. Please note that this release did very limited tests so thing may break.
Release highlights:
- 4.1.6 kernel (-rt for MPD)
- Jessie 8.7
- MPD 0.19.12
- support APU2 board and leds
There is no plan on Stretch-based release on Voyage Linux and MPD.
Getting Started - PXE boot (v0.10.x)
README.pxe
=============================================================================
                     __  __
                     \ \/ /___ __  __ ___  ___  ___
                      \  // _ \\ \/ /,-_ |/ _ |/ -_)
                       \/ \___/ \  / \___,\_  |\___|
                               _/_/        _'_|
                         { V o y a g e } - L i n u x
                          < http://linux.voyage.hk >
==============================================================================

This README.pxe provide information on how to start a PXE+NFS server for
network booting environment using Voyage Live CD. This is useful to install
voyage from Live CD over the network.

==============================================================================
Starting the Live CD as PXE server
==============================================================================

To start PXE environment from live-cd, after login root (password: voyage) ,
type:

	# remountrw
	# /etc/init.d/voyage-pxe start

where  is the serial console speed.  Without this parameter, the
default is 9600.  Hence, to start PXE server for WRAP/ALIX board, you should:

	# remountrw
	# /etc/init.d/voyage-pxe start 38400

You can also set  to 0 to disable serial console.  This is useful
for booting generic PC.

The PXE enviroment on the Live CD assumes eth0 is connected to the network.
/etc/init.d/voyage-pxe will set 192.168.1.200 to eth0, start a TFTP and NFS
sevice, also start dnsmasq to offer DHCP lease of 192.168.1.10-20 for netboot.

To shutdown PXE server environment,

	# /etc/init.d/voyage-pxe stop

==============================================================================
Booting a PXE client and starting automated installation
==============================================================================

Start your WRAP/Soekric board or PC to boot from network. When the bootloader
is loaded, you have several options:

  1. PXE Boot Voyage Linux with a login shell
  2. Start automated install for WRAP (/dev/hda and 38400 serial console)
  3. Start automated install for ALIX (/dev/hda and 38400 serial console)
  4. Start automated install for APU (/dev/hda and 115200 serial console)
  5. Start automated install for 45/48xx (/dev/hda and 19200 serial console)
  6. Start automated install for 55xx (/dev/hda and 19200 serial console)
  7. Start automated install for 6501 (/dev/hda and 19200 serial console)
  8. Start automated install for gerenic PC (/dev/hda and no serial console)

The boot prompt will wait for 5 seconds.  After the timeout, option 1 (login
shell) will be started automatically.

*** Please note that option 2-6 for automated install will erase your disk on
    /dev/hda and install a fresh copy of Voyage Linux.  Make sure you know what
    it is going to do before choosing option 2-6.

==============================================================================
Installing Voyage Linux on a PXE booted environment
==============================================================================

If you want to go through all the steps for manual install, select option 1.
After boot with a login shell, you can login as root.  To install voyage under
netboot environment, you can follow the below procedures:

1. Create distribution directory for installation

	# mkdir /tmp/root
	# mount -o loop /lib/live/mount/medium/live/filesystem.squashfs /tmp/root
	# cd /tmp/root

Note: for version < 0.9~rc2, use
	mount -o loop /live/image/live/filesystem.squashfs /tmp/root


2. Make a mount point for installation disk

	# mkdir /tmp/cf

3. Format target disk device

	# /usr/local/sbin/format-cf.sh /dev/hda

This will create /dev/hda1 ext2 partition on /dev/hda disk device.
** Note that this operation is very dangerous since it will erase your disk!
   Make sure what you are doing and must do it right!

4. Start voyage.update installation script

	# /usr/local/sbin/voyage.update

Following the instruction to select /tmp/root as distribution directory, and
/tmp/cf as mount point.  After the installation complete, simple reboot the
board and Voyage will be started!

Note: You may get read-only file system messages after exiting installation.
This is normal because your settings cannot be updated on a mounted squashfs.

There are some additional packages installed for PXE and NFS server.  After
starting Voyage, you can safely remove them by:

	# remountrw
	# apt-get remove syslinux atftpd nfs-kernel-server \
                     bzip2 sg3-utils minicom

After all, remove the last line in /etc/dnsmasq.more.conf:
	conf-file=/etc/dnsmasq.pxe.conf

Important Note:
The current NFS server and client code is unstable for long time use.  Hence,
it is not recommended to use PXE+NFS environment for real production.  It is
only good for installing Voyage Linux at the moment.
Getting Started - Live CD (v0.10.x)
README.live-cd
=============================================================================
                     __  __
                     \ \/ /___ __  __ ___  ___  ___
                      \  // _ \\ \/ /,-_ |/ _ |/ -_)
                       \/ \___/ \  / \___,\_  |\___|
                               _/_/        _'_|
                         { V o y a g e } - L i n u x
                          < http://linux.voyage.hk >
==============================================================================

This README.live-cd provide information on how to install Voyage Linux from the
Live CD.

==============================================================================
Installing Voyage Linux to a hard disk from Live CD
==============================================================================

Afte booting the Live CD, login as root (password: voyage)

1. Create distribution directory for installation

	# mkdir /tmp/root
	# mount -o loop /lib/live/mount/medium/live/filesystem.squashfs /tmp/root
	# cd /tmp/root

Note: for version < 0.9~rc2, use
	mount -o loop /live/image/live/filesystem.squashfs /tmp/root

2. Make a mount point for installation disk

	# mkdir /tmp/cf

3. Format target disk device

	# /usr/local/sbin/format-cf.sh /dev/hda

This will create /dev/hda1 ext2 partition on /dev/hda disk device.
** Note that this operation is very dangerous since it will erase your disk!
   Make sure what you are doing and must do it right!

4. Start voyage.update installation script

	# /usr/local/sbin/voyage.update

Following the instruction to select /tmp/root as distribution directory, and
/tmp/cf as mount point.  After the installation complete, simple reboot the
board and Voyage will be started!

Note: You may get read-only file system messages after exiting installation.
This is normal because your settings cannot be updated on a mounted squashfs.

There are some additional packages installed for PXE and NFS server.  After
starting Voyage, you can safely remove them by:

	# remountrw
	# apt-get remove syslinux atftpd nfs-kernel-server \
                     bzip2 sg3-utils minicom

After all, remove the last line in /etc/dnsmasq.more.conf:
	conf-file=/etc/dnsmasq.pxe.conf


==============================================================================
Installing to a Thumb-drive or Disk-constraint system (net4826)
==============================================================================

Follow the instruction to install Voyage Linux to a ext2 partition with root
squashfs filesystem like the Live CD format.  This is done by extlinux.

1. As usual, create mount point for the installation disk and format it

    # mkdir /tmp/cf
    # /usr/local/sbin/format-cf.sh /dev/hda

This will create /dev/hda1 ext2 partition on /dev/hda disk device.
** Note that this operation is very dangerous since it will erase your disk!
   Make sure what you are doing and must do it right!

2. Mount the disk and copy CD content to disk device

    # mount /dev/hda1 /tmp/cf
    # rsync -aHx /live/image/* /tmp/cf

3. Create extlinux.conf and install extlinux

    # cp /tmp/cf/isolinux/isolinux.cfg /tmp/cf/isolinux/extlinux.conf
    # extlinux -i /tmp/cf/isolinux

4. Update master boot record for disk device

    # cat /usr/lib/syslinux/mbr.bin > /dev/hda

After all, reboot!

There are some notes when using this installation method:

a. You will have a read-only squashfs root filesystem on a CF that consumes
   just 36MB and you cannot modify the rootfs.
b. By default, all changes made to the system reside on tmpfs.  i.e. Changes
   are lost after reboot.  You can preserve the changes by creating another
   partition and labeled it as "casper-rw", or create a loopback file called
   "casper-rw" at /
   (see https://help.ubuntu.com/community/LiveCDPersistence: this is not tested
   and need more exploration)
c. You will still be able to boot Live CD again after the installation.  But
   once the CD is booted, the installed disk with be mounted as rootfs and you
   are unable to umount it.  To get around this, you need to specify the
   following command at boot prompt (assume CD-ROM device is /dev/hdc):

   		linux bootfrom=/dev/hdc
Voyage Linux 0.10.0 released
Voyage Linux 0.10.0 with Debian 8.0 Jessie is finally released today. Kernel is now updated to 3.16 series. This release is still using sysvinit as the system and service manager instead of systemd in jessie default installation.
All Voyage Linux users please note that the release cycle of Voyage Linux would be longer in the next releases, at 6-9 months for a new release. Nevertheless, there are still some planned enhancements in the pipeline, e.g. linux kernel 4.0, grub2 and EFI support.
Voyage MPD 0.10.0 released
We are pleased to announce a new release of Voyage MPD[1] 0.10.0 release.
voyage-mpd-0.10.0.tar.bz2 [2015-05-01] [Live CD]
This release is based on Voyage Linux 0.10.0 with Debian 8.0, which was released on 26 Apr 2015 . See ChangeLog[2] for more information about changes in 0.10.0 release. In this release, kernel continues to use 3.14.12 real-time kernel but MPD version is updated to 0.19.9. This version also added AirPlay supoprt via the pre-installed shairport daemon.
For more information about Voyage MPD, please visit:
[1] Voyage MPD - http://linux.voyage.hk/voyage-mpd
[2] ChangeLog - 0.10.0 Change Log
Daily is now Debian Jessie
As Debian Jessie 8.0 has been frozen since last Nov [1] [2], Voyage Linux and MPD daily built is now changed to Jessie. In addition, distribution tarball is now with extension .tar.xz, instead of .tar.bz2, to opt for higher compression rate.
A new Voyage Linux and MPD will be released soon after Jessie is released. While there is no official release date for Jessie, please stay tuned.
Please join us to test Voyage Linux daily based on Jessie. Thanks.
[1] - https://www.debian.org/News/weekly/2014/15/#Freezing
[2] - https://wiki.debian.org/DebianJessie
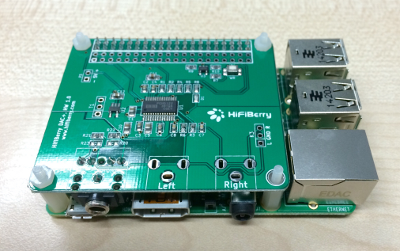
New Donation of Hifiberry DAC+ and Announcement of Raspberry Pi port
![]() We are pleased to announced that HifiBerry has donated a DAC+ high-resolution digital-to-analog converter to Voyage Linux community.
We are pleased to announced that HifiBerry has donated a DAC+ high-resolution digital-to-analog converter to Voyage Linux community.
Apart from this donation, today we also announce the kick-off of Voyage Mubox porting to Raspberry Pi. This project not only aims at running MuBox on Raspberry Pi, but also provide seamlessly integration of Voyage MuBox, Raspberry Pi and HifiBerry DAC. As an initial proof of concept, we target to port MuBox to RPi B+ board with HifiBerry DAC+.
You can find more information about HifiBerry and their products here.
Once again, we would like to express our warmest thank you to Hifiberry for their generous donation.
Special Thanks to Yawarra Tiny Computers
![]() Over the past few months, Voyage Linux community received regular donations from Yawarra Tiny Computers (Yawarra).
Over the past few months, Voyage Linux community received regular donations from Yawarra Tiny Computers (Yawarra).
Yawarra donates to Voyage Linux Community on behalf of their newsletter subscribers who stay on their list for a minimum of three months to qualify for the donation. Up until this month, Yawarra had made their 4th donation.
We would like to express our warmest thank you to Yawarra for their generous donation and support. It is not about the amount of money donated, but the support to the community through any form of donation is crucial to encourage continuation of the project.
To know more about Yawarra Tiny Computers, please visit their web site.
Voyage 0.9.5 released
It has been a long time not updating Voyage Linux. It is time to announce Voyage Linux 0.9.5, which upgrades to Debian "Wheezy" 7.7 with 3.14.12 kernel.
PCEngines' APU board is well tested. However, we don't have enough time and resource to test on the old ALIX boards. Hence, your feedback and report on ALIX board is very important to us.
Voyage MPD 0.9.5 released
We are pleased to announce a new release of Voyage MPD[1] 0.9.5 release.
voyage-mpd-0.9.5.tar.bz2 [2014-11-11] [Live CD]
This release is based on Voyage Linux 0.9.5 with Debian 7.7. See ChangeLog[2] for more information about changes in 0.9.5 release. In this release, we fallback MPD version from 0.18 to 0.17.6. Most of the users reported that this 0.17 version sounds better than the newer 0.18. In addition, this release also uses real-time kernel to reduce jitters when playback music.
For more information about Voyage MPD, please visit:
[1] Voyage MPD - http://linux.voyage.hk/voyage-mpd
[2] ChangeLog - 0.9.5 Change Log
[3] Report to us - http://linux.voyage.hk/mailing-lists